This article came about while I was attempting to recover data from an HP ProDesk that was configured with an Intel Optane SSD and encrypted using BitLocker.
The device had recently been upgraded from Windows 10 to Windows 11 by one of our technicians. After the upgrade completed, the system failed to boot. Worse still, Windows Recovery Environment (WinRE) did not recognise the Optane SSD at all. To complicate matters further, the BitLocker recovery key was unavailable.
I attempted to connect the drive to other systems that were also configured for Intel Optane, but had no success accessing the data. At this point, it became clear that recovering the SSD would require understanding exactly how Intel Optane works and how Windows interacts with it.
What Is Intel Optane?
Intel Optane (or Intel 3D XPoint) is a high-speed memory technology developed by Intel, based on its 3D XPoint architecture. In terms of performance, it sits between traditional DRAM and NAND storage, offering very low latency and high endurance.
Intel Optane can be used in two primary ways:
- System Acceleration (Optane Memory)
Acts as a cache for frequently accessed data, accelerating slower HDDs or SSDs. - Storage Device (Optane SSD)
Functions as a standalone NVMe SSD, designed for workloads that benefit from low latency, such as databases or virtualization.
How Is Intel Optane Used in Windows?
In Windows environments, Intel Optane is typically configured in one of the following ways:
Optane Memory Module + SSD/HDD
Intel’s Rapid Storage Technology (RST) pairs an Optane module with a standard storage device to create a hybrid setup. Frequently accessed files are cached on the Optane module, improving performance.
Optane SSD
Installed and used similarly to a standard NVMe SSD, but with much higher performance characteristics.
It’s important to note that Windows does not natively manage Optane caching. Instead, it relies on Intel Rapid Storage Technology (RST) drivers and the Intel Optane Memory and Storage Management software.
Why Is the Intel Optane Desktop Software Required?
The Intel Optane Desktop Software (or Intel RST UI) is essential for accessing Optane-enabled storage because:
- Optane caching uses a logical volume created by Intel RST, not a standard disk partition.
- Without the correct drivers and software, Windows and most third-party tools cannot correctly interpret the Optane-enabled volume.
- The software provides critical management features such as enabling or disabling acceleration, pairing and unpairing drives, and performing firmware updates.
Without this software, the operating system may detect the physical drives but will not understand the caching layer that ties them together.
Why Does the Disk Size Appear Incorrect?
One common symptom when Optane drivers are missing is that disk tools report an incorrect disk size.
For example, a technician might see an SSD reported as 2TB, even though the physical SSD is only 512GB.
This happens because:
- When Optane acceleration is enabled, Intel RST creates a virtual RAID-like volume combining the primary storage device and the Optane module.
- Recovery environments or third-party tools that do not load Intel RST drivers will misinterpret this metadata.
- These tools often display the size of the logical volume, not the actual physical disk.
Example:
- HDD: 2TB
- Optane SSD: 512GB
- Reported volume size: ~2TB (incorrectly shown as the SSD size)
If you encounter this behaviour, it almost always means the required Optane/RST drivers or software are not loaded or installed.
Disabling Intel Optane (Windows – Recommended)
Disabling Optane from within Windows is the recommended and safest approach, and it’s the method advised by most vendor support articles.
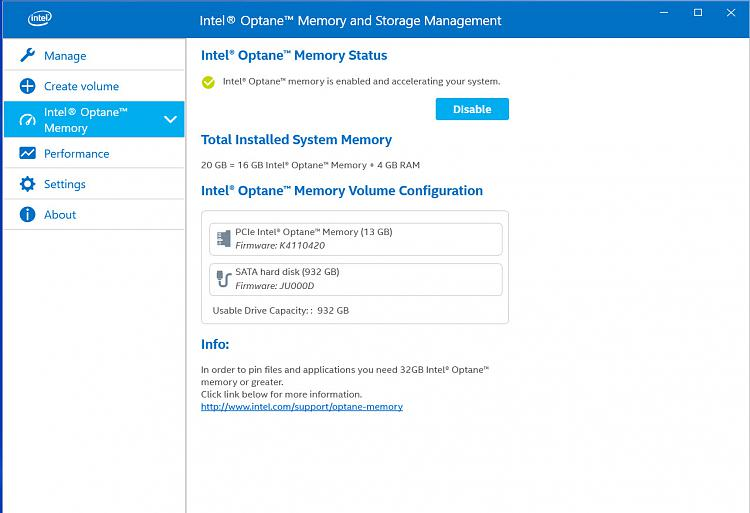
Using the Intel Optane or Intel RST application:
- Open the Intel Optane Memory and Storage Management application.
- Select Disable.
- The software will remove the Optane acceleration and revert the storage back to a standard SSD configuration.
This software can be downloaded directly from the HP Support website for the specific model.
Once disabled, the SSD becomes accessible as a normal storage device.
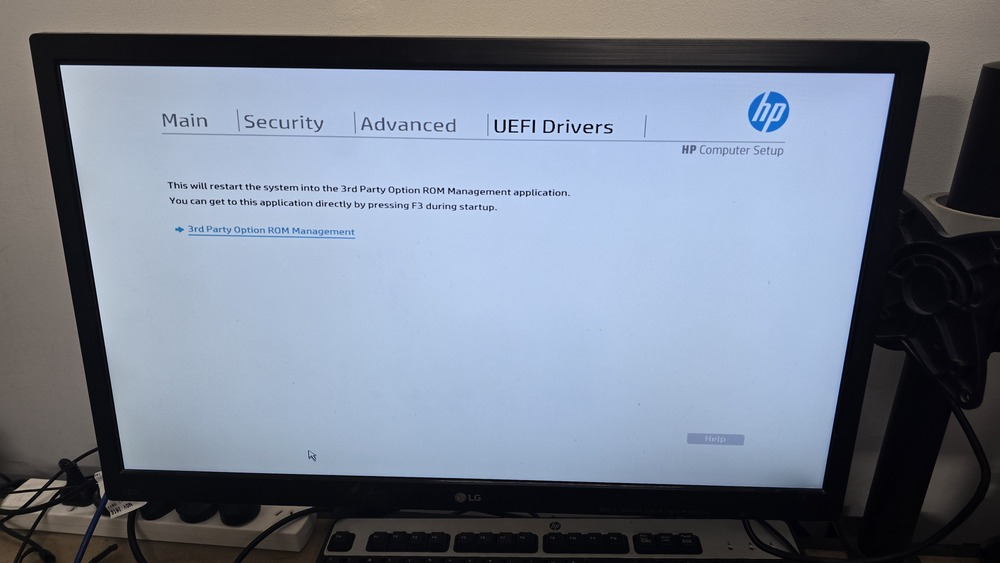
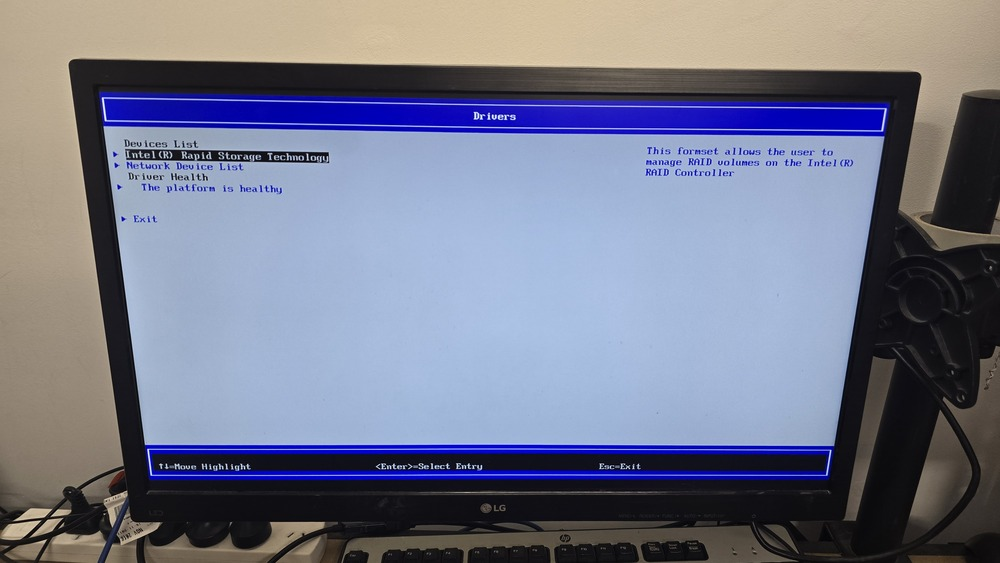
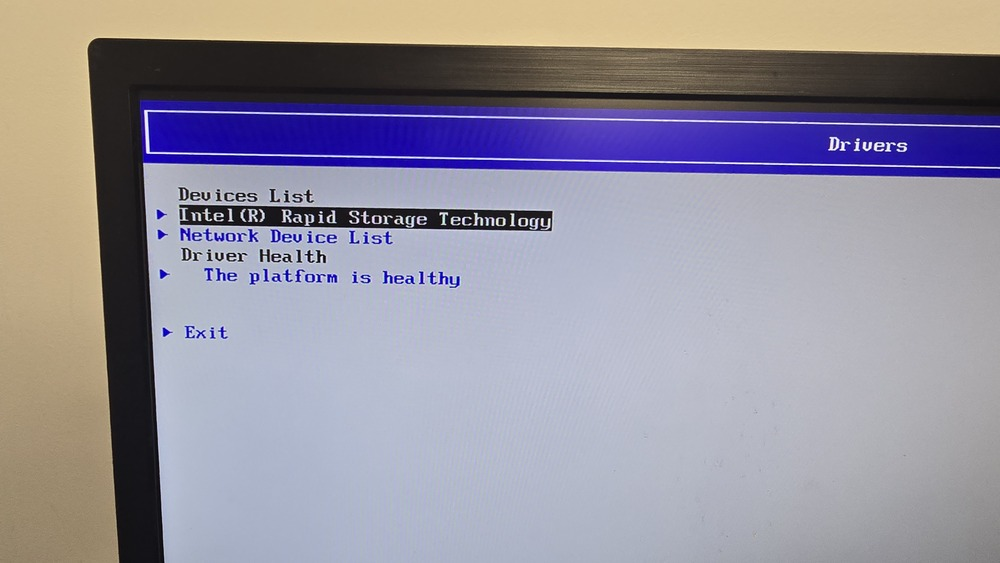
Disabling Intel Optane via UEFI (Last Resort)
This is specific for the HP ProDesk 600 G6 Desktop Mini PC and WILL vary on different hardware. Please do your research on your hardware to avoid data loss.
If the system cannot boot into Windows at all, Optane can be disabled directly from the UEFI firmware. This should only be used as a last resort.
Steps may vary slightly by vendor, but on HP systems the process is typically:
- Boot the PC and enter UEFI.
- Choose Boot to 3rd Party Utilities.
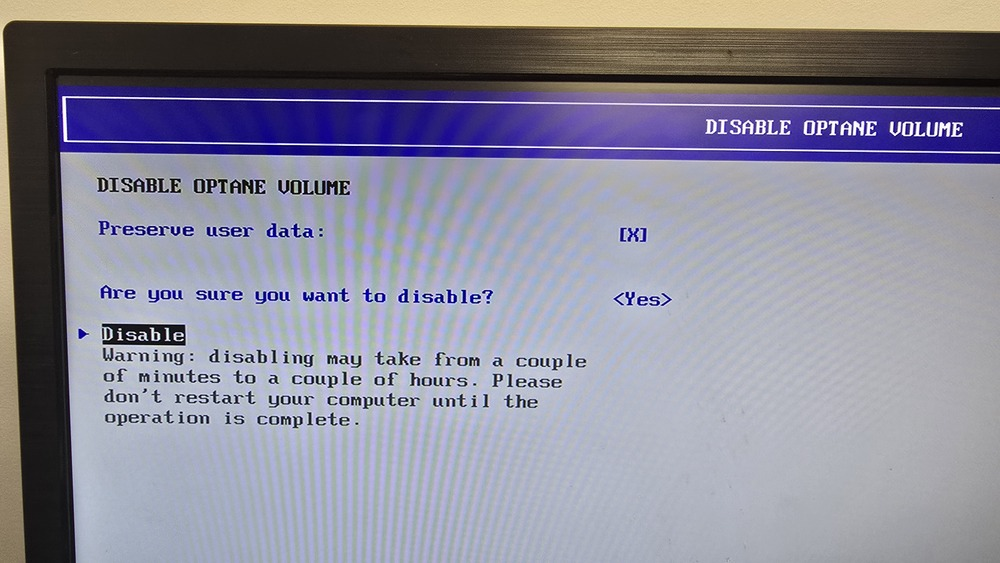
- Select Disable Optane Volume.
- Ensure Preserve user data is enabled.
- Proceed with the disable operation.
Once completed, the system will return to the main menu. This process can take several minutes depending on the size of the SSD and the amount of data stored. There is typically no progress bar shown, so patience is required.
Final Thoughts
Intel Optane can deliver excellent performance benefits, but it also adds complexity when things go wrong—especially during OS upgrades, recovery scenarios, or when BitLocker keys are unavailable.
Understanding how Optane relies on Intel RST drivers and software is critical when troubleshooting boot failures or attempting data recovery. Without the correct tools loaded, even experienced technicians can be misled by missing disks or incorrect disk sizes.
Hopefully, this breakdown helps avoid some of the pain I encountered and provides a clearer path to recovery if you ever find yourself dealing with an Optane-enabled system that refuses to cooperate.
Check out some of my other hardware articles here!